
I published this article on Evernote in 2015 to answer questions from non-expert colleagues who were asking me how to simply colour a drawing on a computer. Since they regularly ask for it, I decided to import the article here on my blog.
I will explain a very simple and quick method. It is simple but complete. The starting point is (can be) a piece of paper with the drawing. Ideally, the drawing is not already coloured and the lines are in black ink on a white background for a strong contrast. If not… it’s still possible but you will spend more energy.
The method uses Adobe Photoshop CS6 but all steps are applicable to older/latest versions of Photoshop and on GIMP too. If the method does not use any advanced functionality, I assume, however, that you have a basic knowledge of Adobe Photoshop, or equivalent, to feel comfortable in the tool. Note that in the text below “Adobe Photoshop” is shortened in PS.
Last but not least, you can work with your mouse, then you need a good mouse and a good dose of patience, but the ideal is to work with a tablet and a stylus (Wacom for example).
Step 1: Digitalise your drawing
You can use either a scanner or a camera to convert your hand-made drawing to a digital file. A scanner is the best solution for sketches on a paper which size fits with the scanner (common sizes are A4 to A3). You have companies that offer the scan of very large supports but this service has a price. Otherwise, using a camera is always a good alternative for all kind of sizes.
- When using a scanner, check these settings:
- Resolution set at 300 dpi minimum, ideally 600 dpi
- Always use the Color mode, even with B/W drawings
- When using a camera, whatever the device or model, ensure:
- A uniform and constant lighting on the whole drawing surface to reduce shadow areas to the minimum. Indirect lighting is the best. Never use the flash!
- Your camera lens and your drawing are on parallel planes to reduce distortion to the minimum.
- Use a tripod or keep your hands steady to avoid motion and blur.
- Camera or smartphone?
- Cameras (DSLRs or Compact System cameras) still offer a better resolution and sharpness due to their larger sensors – a 50mm lens gives the least distortion -, and they are still superior in low or difficult lighting.
- Lighting is very important when using a smartphone.
- For both: take a bunch of shots with different setups and select the best result.
- There are plenty of good, and free, scanner apps for smartphones. Just google ‘best free photo scanner app’ to choose one.
Step 2: Import and prepare
I would never say it enough: Always work on a copy of your original file!
- PS Menu > File > Open : select your file (a copy or your original!) on your computer and open it
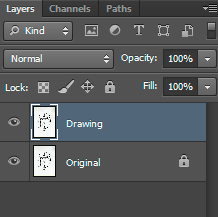
- Display the “Layers” window: PS Menu > Window > Layers (F7)
- Your drawing is in the unique visible layer called “Background”
- Double-click the “Background” layer to unlock it
- Rename the layer into “Original”
- Duplicate the layer and Rename the duplicated layer in “Drawing”
- Hidden and Lock “Original” layer. We will work on “Drawing” layer
Step 3: Adjust: Rotate / Cut
- If your image is not oriented correctly : PS Menu > Image > Image rotation
- Often with a photo, you have first to change the perspective of the drawing to a rectangle: PS Menu > Edit > Transform > Distort or Perspective
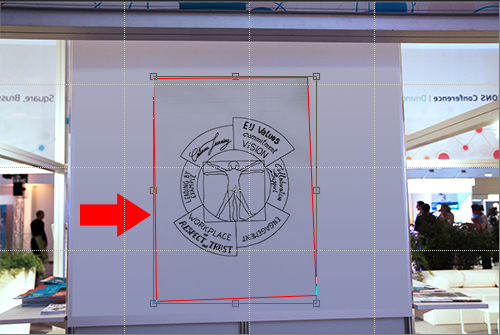
- Then discard from the image what is not relevant around the drawing:
- PS Select tool > select the zone of the image that you want to keep. You can always adjust your previous selection: Menu > Select > Transform selection
- PS Menu > Image > Crop
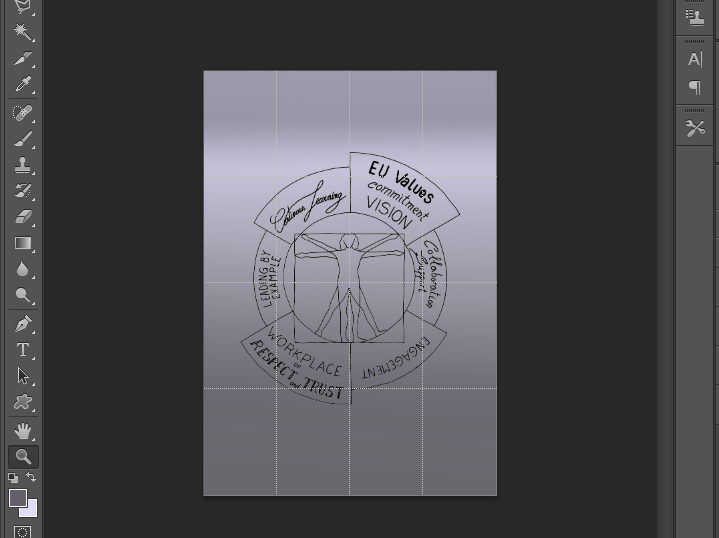
Step 4: Adjust the white balance
As in our example, the white balance is never correct from photos (remember the importance of lighting in step 1?). Depending on the quality of the photo, you can try one of these techniques, or combine them. Play with them to discover which one works best for you:
- PS Menu > Image > Auto-contrast
- PS Menu > Image >Adjustments > Brightness/Contrast
- PS Menu > Image >Adjustments > Levels
- PS Menu > Image >Adjustments > Curves
This last technique is my favorite because it allows you to define your white, gray and black points with samples in the image:
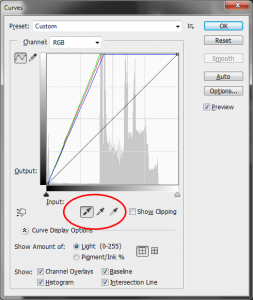
Look at the result with Curves:
- For photos of landscapes of several meters (common in graphic recording), you should envisage to divide the image into several areas, apply the “Curves” tool on them and mix appropriately them. Read this article in French by @_Fanny_Thomas “Comment retoucher ses photos de fresque ?” that explains the full method.
Step 5: Clean-up
You can use one of these tools to remove scratches, dots, and other mistakes in the drawing:
- “Spot healing brush tool”
 when possible because it’s just magic (note that it doesn’t work on an isolated drawing – see next point)
 - “Brush tool”
 set to the background color
 - “Eraser tool”

Since these tools have an irreversible effect, I personally prefer to use “Layer masks” to always be able to recover what I deleted.
I will not explain Layer masks here but you can search for good tutorials on internet.
Step 6: Isolate the drawing
We will now detach the black lines from the paper.
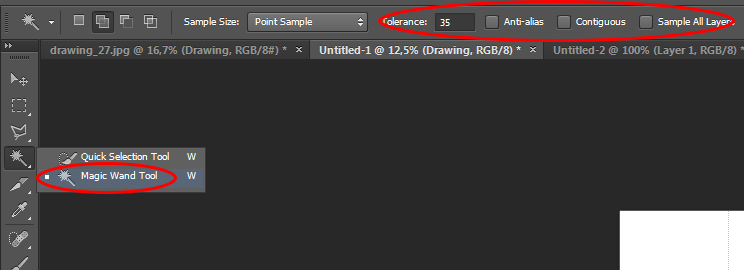
- PS > Magic Wand Tool with tolerance set to 0 -> 50 + options Anti-alias, Contiguous and Sample All Layers unchecked
- Click on a white area of the drawing and press Delete to remove the White colour from this layer. All that remains are the lines that have been drawn in ink.
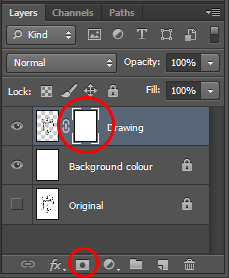
- Add a new layer below “Drawing” and rename it “Background colour”; fill in this new layer with white colour or any other colour and lock it.
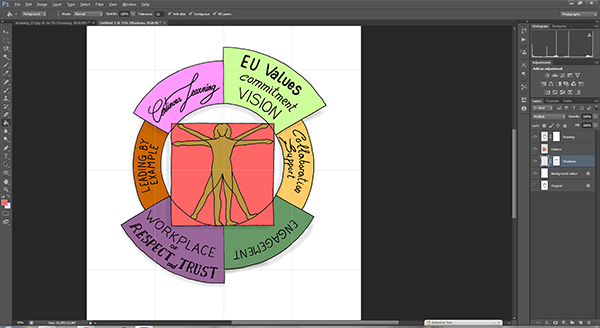
Step 7: Flat colours and shadows
Prepare your layers to welcome colours:
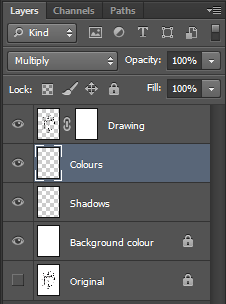
- Set blending mode of the “Drawing” layer to “Multiply”
- Add a new layer below “Drawing” and rename it “Colours” + set its blending mode to “Multiply”. This layer will welcome your flat colours.
- Add a new layer below “Colours” and rename it “Shadows”. This layer will welcome your shadows.
- Add as many layers as you need (one by colour, one by effect, one by gradient, etc)
All what we have done till now was to prepare our work for colouring. You are ready now to fill in the related layers (Shadows or Colors) with colors:
- You have complete freedom using the different types of brushes available to vary the effects and textures.
- For shadows, I like the “Air Brush” with Opacity and Flow set to “25-75%” and brush size as large as possible
- On closed delimited area, I use the “Paint bucket tool” with Contiguous and All layers options checked
- On open delimited area, I use one of the “Lasso Tool” with Anti-alias option not checked.
Step 8: Draw
It may be useful to add lines to the original drawing.
- Add a new layer below “Drawing” and rename it “Pencil” and set its blending mode to “Multiply”
- Use different types of brushes or better, use the Pencil tool to draw (this is where the use of a stylus and a tablet makes a big difference compared to the mouse!)
Step 9: Save
Always save your work in Photoshop format (.PSD) , this allows you to keep your layers and to come back later if necessary. Then, depending on the destination of your image:
- For screen, typically for the web:
- First reduce the size and resolution of the image to one that is suitable for a screen: PS Menu > Image > Image size > Set Resolution to 75 pixels/Inch and a set Width/Height (1024 pixels is already a large image on internet)
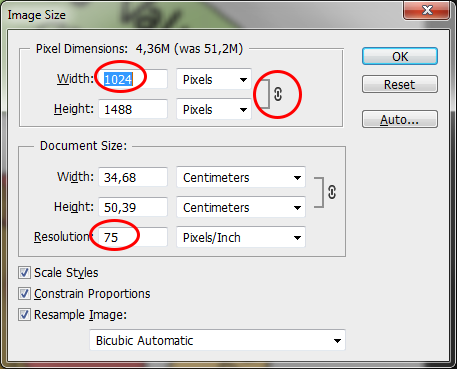
- Then save it: PS Menu > Save for Web and devices > PNG-24 or Jpeg format
- First reduce the size and resolution of the image to one that is suitable for a screen: PS Menu > Image > Image size > Set Resolution to 75 pixels/Inch and a set Width/Height (1024 pixels is already a large image on internet)
- For printing, the question is more complicated. Ask to the “print officer”:
- Required file format: EPS, PDF, TIFF, PSD, etc
- Required color mode: CMYK (for offset printing) or RGB (for photo printing). You can set it in PS Menu > Image > Mode.
- If all your fonts are supported (if you added text from Photoshop)
- Export your work to the right file format: PS Menu > Save as
Step 10: Publish and share
In my opinion, the best solution is to publish your work on a website where you have the editorial control and to share/promote it from that place through social media. [This was valid in 2015 and still remains valid in 2018].
But there are plenty of other solutions out there:
- You can publish your work on photo libraries like Flickr or on art galleries like Deviantart from where you can share/promote it on social media.
- You can post and share directly your work on a social media platform like Facebook, Instagram, Tumblr, G+, Pinterest, etc (pay attention to the copyright of your images that is often transferred to the owner of the platform)
- Finally, you can use cloud storage like Dropbox, Google Drive, etc.
Your questions and comments are more than welcome.